Showing posts with label cute. Show all posts

Friday, 23 March 2012

Finished Object Bunny Friday

The weather is amazing right now, 19 degrees, sun and no wind, perfect. 


After a busy day with a job application and some chores it was time for a wee bit of knitting on the balcony.


A new project is started, but more about that on next Wednesday. Today it is Friday, so I will share a little finished object with you. Do you remember this book I talked about? 


I made this little Easter bunny, want to see how he turned out? 


Isn't he adorable? I really love how he turned out (smugness alert). He feels right at home too. 


He loves to cuddle....


He loves to show his little pom pom tail...


And loves to hang out. 


I really had a hard time making this since I never made a knitted doll before, crochet dolls are easy as pie for me. This project required to learn some new techniques.

 It took me some frowning and some struggling but I love how soft it is in comparison with crochet work. Crochet dolls are a bit more stiff and this is oooh sooo soft and cuddly. I really start to love knitting more and more, who would have thought? 

For the project details check out the project on Ravelry here


Thank you all for visiting and thank you for the many many lovely comments on my Beekeeper's quilt progress. It warms my heart :-). 


Please check out Tamis Amis for more Finished Objects!


Friday, 16 March 2012


✿✿✿ Have a great weekend ✿✿✿  

I hope to see you all on Sunday for another link party!

Wednesday, 11 January 2012

WIP Wednesday: A little game

This week has been all about a knit project, my first big knit project. Apart from scarf and mittens I never knit anything wearable. But of course my 65% alpaca yarn deserves something that is worn in what should be a horror winter. All kind of scientists and experts predicted a winter with freezing temperatures. Snow and ice were to be expected.

So far the experts couldn’t have been more wrong. Winter has been far from horror this year; it’s more of a second autumn. That is, without bright autumn colors. Instead we have misty blue and grey and rain, lots of rain. So much rain that part of Holland were threatened to flood. Dykes were strengthened and sandbags were placed. Luckily the water level dropped and all was well. 


Although this horror winter hasn’t shown up yet, no need to despair. I still hope to see some winter wonderlands in January or even February. So to be fully prepared for long walks in the snow and icy forests, I am making a delightful winter project. 


This is a close-up of the project I am making of my yammy alpaca yarn. Can you guess which project it will be? I think some of you might recognize it. It is almost done and I hope to share a finished project with you this week. 


A little more about the yarn; I use to buy a lot of acrylic yarn. Just recently I bought my first wool and now my first alpaca wool. It seems alpaca’s smell wonderful, the dog is intrigued by it. Normally he totally ignores all the yarn lying around, but not this time. He wants to have it, all for himself.  I made a little clip of him so you could see him in “action” together with Mr. Boyfriend. 


This is the first time I participate in the WIP link party and I like it already! Check out the other project at Tami's Amis.

Saturday, 24 December 2011

And the winner is...

Hello lovelies!

It's time to announce the winner of the giveaway! But first a little update haha.


All is well here and everybody is enjoying a deserved holiday. Both Puck and Mr. L. love the stripy blanket that never got finished. It still needs some extra inches but when I want to continue working on it both hubby and dog snuggle under it and make it impossible. Who can blame them right?


I made some heartfelted rings by Tiny Owl Knits! It's a free pattern with a video tutorial to go with it. It was a knit a long and it was so fun to get all the supplies not knowing what the project would be. They are very easy to make and wear, this is how mine turned out: 


The picture was taken in the little sun we got here in Rotterdam. I look very tanned, I can assure you, this is an illusion ;-). You can see both the ring and my "tan" up close in the next picture:


Ok I won't tease you any longer, time to announce the winner! I enjoyed reading all of you comments about the small things you enjoyed. I drew a random number and that number represents a comment. I still don't know how to get this random number thingy on my blog so I made a printscreen:


ttttttttttttttttttttttrrrrrrrrrrrrr..................


And that is........The Craft Giraffe! Congratulations! So get a cup of tea and some needles cause you won yourself the woodland hoodlet pattern! 


I wish you and your families all a very merry Christmas and I'll see you all soon. 


Thursday, 20 October 2011

Wonderful day

I had a wonderful day! I'm totally in the autumn mood. I made a little trip with my parents, brother and some other family in to the woods and I had so much fun! I made some pictures and I hope to find some time to share them with you. Although this trip got me totally revived, this wasn't the thing that made my day. I checked my mail and got out the usual leaflets, bills and other daily mail, until my hand touched a very big envelope. I knew what it was right away! My price I won on the wonderful blog from Hazel, Hazel's Crochet. You should check it out, she also participates in the One a day group with a rainbow blanket! She also added a cute little note and a crochet heart! She is such a sweet person. 


She organized a giveaway and I won this book. It is very big and there are sooo many wonderful patterns. I cannot buy this book in the Netherlands so I am so happy I was lucky to win it. Look at some of the patterns:

Some cute penguins...


Some cute softies, look at the gingerbread man! I am totally going to make him.


But there are also pattern of clothing and blankets like this one...


Or this one! 

Time to make a list of Christmas projects that I want to make and I should get started soon. Time flies. 

Thank you Hazel, for your lovely gift :-). 


Wednesday, 5 October 2011

charming

Hello again!

I tend to hop from one craft project to another, from blankets to amigurumi but also from crochet to sewing to polymer clay. Maybe I am not really focussed for that matter, but it does keep me enthusiastic and thus motivated. It gives some variation and sometimes you can even combine crafts (for example my cupcake keychain I combined crochet with a polymer clay ice cream cone and some ribbon). 

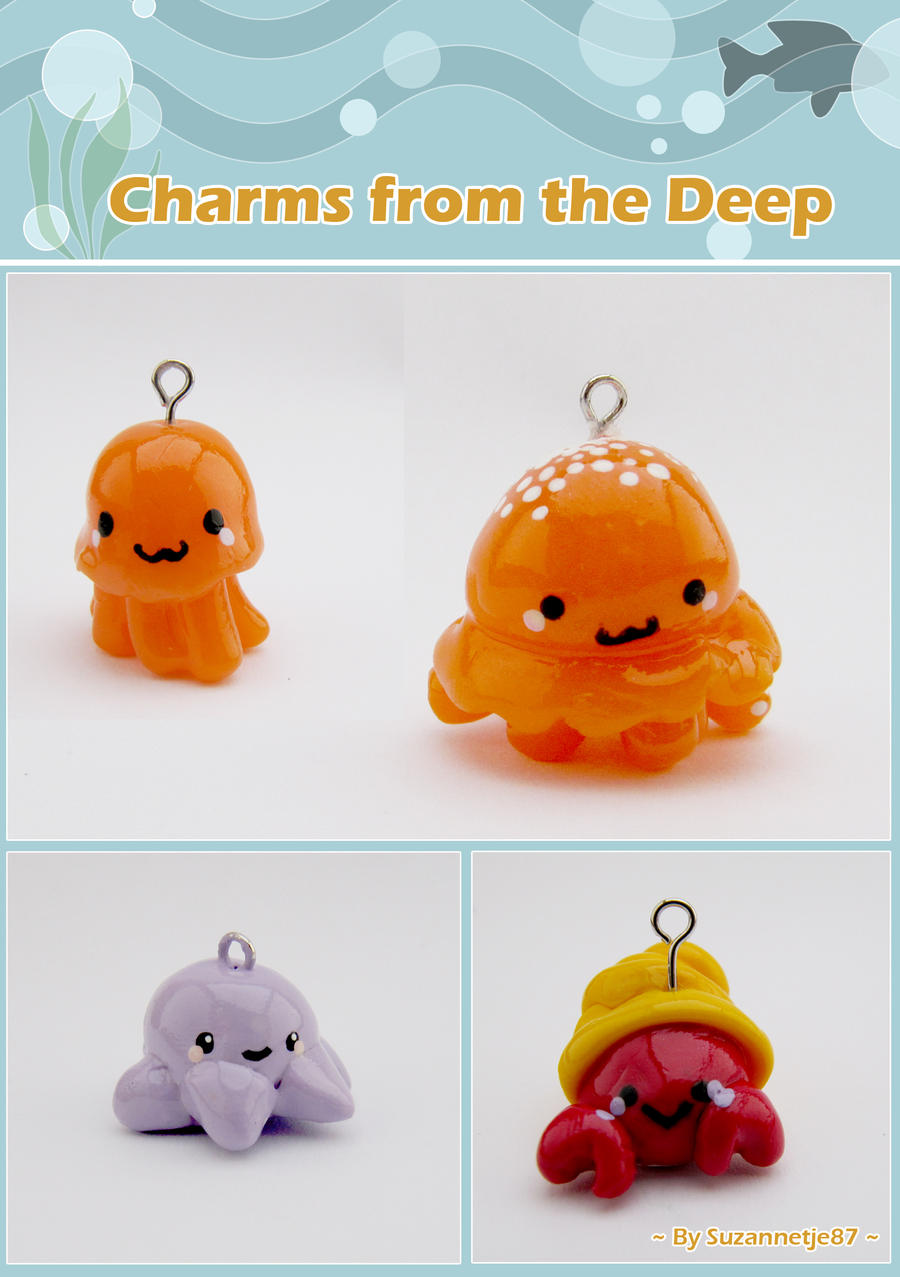
This week I went crafty with polymer clay again, I just love that stuff! It's so easy to use and I found out the possibilities are endless. You can even paint on it! I've seen some pretty cool stuff all around the internet that you can create with clay but the cutiest ones were the charms. So, it was decided. I got out my clay and just tried some things out. Wanna see the result? Ok, here you go:


I made the background in photoshop and my inspiration came (of course) from the beach. In the top of the image you can see a baby and her mommy jellyfish (which I hate in real life, but like this they are rather cute), in the bottom an octopus and a hermit crab. I painted faces on them with acrylic paint after baking and glazed them when the paint was dry. I use the brand FIMO clay, another well-known polymer clay brand is Sculpey but it is not offered in my local stores. It should be simular though. 

Has anyone worked with polymer clay before? 

Lot's of love,

Suzanne

Oh by the way, in the image you see "by Suzannetje87" this is my username on DeviantART. A website for all kinds of crafsts (a bit like Ravelry). So if you are a member there you can find me :-). 

Friday, 16 September 2011

Flashback, amigurumi fun!

One of my first blog posts was about this little amigurumi sheep that I made. So funny to see this post, it's a totally different style. Written in Dutch *so happy I changed to English* and with limited text and pictures not taken so well. But of course I didn't realize that other people would follow this blog! And here we are, 32 followers! Wow, hahaha. 

But since this post about the little sheep, many posts have gone by without amigurumi in it. That's a pitty, cause I find amigurumi so cute. So I started to think about a cute project and I found this on pinterest! What a cute little bunny and with a free pattern. I used Katia Mississippi yarn and it is half cotton half acrylic. It is to die for! Normally I use "cheap"acrylic yarn from Bravo, Annell Rapido or private label from "Zeeman" or "Wibra". The acrylic yarn tends to be more fuzzy and for amigurumi that is not so great. It came out quite neat thanks to this yarn. Mine is slightly different than the one in the pattern, but I think it is still cute! Wanna see?


It did distract me from my One a day project though, shame on me ;-). I will catch up on that this weekend! Have a great weekend yourself!

Hugs Puck and Suzanne

Friday, 9 September 2011

Cakepops

What a great idea for parties! Cake pops! I spotted these on pinterest and knew I had to give them a try!

Don't they look yummie? It is relatively new here in Holland and for those who never seen them, give them a google! So many pretty designs and tastes. 

They are easy weasy to make, although you will need to reserve some time for it. They consist of cake crumbs, something sticky like frosting and a coating.


I made mine of vanilla cake, crumbled it into tiny crumbs in a large bin and mixed it with a cream cheese frosting (just powdered sugar with cream cheese). Then put  it in the fridge for  10 minutes. 

Take them out and roll small balls of the mixture. These go on a sheet of baking paper in the freezer for 15 minutes. In the meanwhile I melted some white chocolate and mixed some red pigment to make it look pretty and pink. Take your sticks and dip them in the pink chocolate. Put them in the balls and wait until the chocolate has solidified. Take a stick with a ball and dip it in the coating. 

If you can't follow, check youtube. So many tutorials there. I put a little disco sprinkles on top, I never stopped like those ^_^.  


I will definitely make more of those in different flavors and designs! What a brilliant concept. Have some of you ever tried making these? If so, pictures would be great!


Thursday, 8 September 2011

My first giveaway!

20 Followers! My oh my, when did that happen? I started this blog like many other bloggers, to keep track of all my creative outbursts, important moments and memories in my life and to get in touch with all the other beautiful creative minds in this world. And now there are people that stop by once in awhile to say hello, it warms my heart a little to be honest. So many kind and wonderful people from all corners of the earth. That needs to be celebrated, so I decided to do a giveaway! Wooohooo, I always wanted to do so and now is the perfect time.

I made a little something for this giveaway. At first I just wanted to crochet something simple, but when I got to it another idea popped into my head. Why not add something non-crochet to pimp it up? Most of you know how to crochet already and as a gift it would be nice to get something different. I knew just the thing for it, a little while ago I made some polymar clay charms.


I made ice cream cones, lolly pops and little cupcakes. And this is how they ended up:


Look at all the colors and shapes, looks yammie right? Adding one of these to some crochet sweetness and some ribbon....and......tadaaaaaaa:


Do you like it? I went crazy from bending all the rings in between the different parts. All the rings are bended separately by hand to form little chains. I cut some ribbon and put them in this clip to hold hem. I made the cone shine with some varnish and of course made something crochet. A cupcake, I just love cupcakes! You can use it as a key chain or as a charm for your bag.

Well, if you like it and you want it, this is how you can get it *with pain in my heart, cause I sort of have bad wanties for it myself*:

Post a comment in which you state that you want to participate (make sure you are a follower, if not join the club!). It's that simple. I will be picking a winner on Friday 23rd September, so make sure you enter before. 

Lots of love, Suzanne

PS: for more pictures of the key chain check here on my Ravelry page.

PPS: Everybody can join! No matter how far away you live, as long as you have an address ;-).

Friday, 12 August 2011

Hairy sewing project


Hello lovelies,

After a period of silence here in the city I return to you with a sewing project. My sewing machine was starting to collect dust and thus it was time to start using it again! And what better than a project with a purpose, namely keeping the doggy of the couch by making a dog pillow he could not resist!


 Every time he snuggles on the couch dreaming of other dogs and treats, leaving a huge amount of spiky hairs on the creamy sofa. Mostly when Mr. L. and I are not around and when we return, he looks at us with the biggest puppy eyes trying to say: “It wasn’t me” . Puck gave those exact same eyes when I put the pillow on the ground and he instantly claimed it. “Ooooh please master, can I please have it?”


 Well, I guess he likes it pretty bad haha. And the best thing is that I made it from left over fabric with little stars and some felt and wool for embroidery. It didn’t cost a dime. If you also have a dog claiming the couch here some directions of how to make it:

  1. Get two pieces of fabric
  2. Cut two pieces of 80 x 60 cm's, these will be the top and the bottom of the pillow.
  3. Cut two pieces of 60 x 20 cm's and two pieces of 80 x 20 cm's in the other colour fabric.
  4. Put the embroidery on the top. In my case I did my dog's name in cross stitches and a felt bone filled with a little stuffing. 
  5. First pin and sew all the sides to the top of the pillow.
  6. Now pin and sew all the sides together to form some kind of container. 
  7. Pin the bottom of the pillow and sew all the sides except for one. 
  8. Turn the pillow inside out.
  9. Fill the pillow with what ever stuffing you like. Mine is filled with polyester stuffing. 
  10. Close the pillow, you can also add a zipper but I choose not to.

As you can see, I used a embroidery hoop. I found it very helpful. I also ironed the fabric before using it. I think it turned out a bit messy in the corners (they don't precisely line up), but fortunately Puck couldn't care less. 


Have a nice weekend, lots of love from Puck and me.

xxx


Wednesday, 22 June 2011

Back to square one...

Hi you,

It feels like a new start, writing in English instead of writing in Dutch. It should be good for the development of my writing skills haha, so I apologize in advance for all the mistakes I will doubtlessly make. 
It has been raining cats and dogs in Holland, all is grey and dark. Even Puck is bored *let’s face it, going to the park for hours appeals less when lightning strikes*. But I look at the bright side, its perfect weather for crochet. And although I have some unfinished projects I found a pattern that I just couldn’t resist. 


I love squares and I love quick projects, so this pattern is perfect for me. Also, I still badly wanted a nice blanket to cover my couch. I choose slightly different colors. I wanted it to be more bright and but in some white.  

Look at the squares piling up! I decided that I need 40 squares in total. I now have 35 already and maybe I will find some time today to sit down with a cuppa tea and hook the last ones too. Can’t wait to finish it and wrap it around me.

Tuesday, 7 June 2011

Schaapje, schaapje

Even een klein haak projectje tussendoor. Ik vond een schattig patroon op ravelry van een amigurumi schaapje. Het is geen ingewikkeld patroon en besloot hem te maken voor een vriendin. Maar, naar mate het schaapje meer vorm begon te krijgen ging ik me meer en meer aan hem hechten. Heel egoïstisch zit hij nu bij me op de bank. Ik weet het, ik ga me schamen haha. Maar kijk nou hoe schattig hij is!